Triple-Layer Neapolitan Coconut Ice
A nostalgic trip down memory lane, these Neapolitan Coconut Ice bars combine a crunchy chocolate base with soft, sweet layers of vanilla and rose-tinted coconut.

Getting the Texture Right
The secret to great coconut ice is the ratio of wet to dry ingredients. The mixture should be stiff and heavy. If it is too wet, it won't set properly and will be difficult to slice. If it's too dry, it will crumble when you try to eat it.
Using sweetened condensed milk acts as a foolproof binder, replacing the tricky sugar-boiling stage of traditional recipes. It ensures a fudge-like consistency that remains soft for days.
💡 Professional Tip
If the mixture is too sticky to handle when pressing into the pan, lightly dust your hands or the back of the spoon with icing sugar to prevent sticking.
Frequently Asked Questions
No, this is a completely no-bake refrigerator cake. The butter in the base and the sugar in the filling set when chilled.
No, fresh coconut contains too much moisture and will make the slice weep. Stick to dried, desiccated coconut (fine shred) for the best structure.
It keeps incredibly well! Store it in an airtight container in the fridge for up to 2 weeks. It actually tastes better after the flavors meld for a day.
Yes, but add it drop by drop. Gel food coloring is best as it doesn't add extra liquid to the mixture, which could make it sticky.
Absolutely. Wrap the block or individual slices tightly in cling film and freeze for up to 3 months. Thaw in the fridge before serving.
Sure! You can omit the cocoa for a plain biscuit base, or skip the base entirely for a traditional 2-layer coconut ice.
You may have measured the coconut too generously. Add a teaspoon of milk or more condensed milk to bring it back together.
Run a sharp knife under hot water, dry it off, and then slice. The heat helps glide through the dense coconut and butter layers.
Recipe Troubleshooting Guide
Mixture Too Sticky
Problem: The coconut layer is sticking to hands and spoon
Solution: Dust hands with icing sugar or chill the mixture for 10 minutes before pressing it into the pan.
Layers Separating
Problem: The pink layer falls off the white layer
Solution: Press the layers together firmly while they are room temperature. If the bottom layer chills too much before adding the top, they won't bond.
Base Too Hard
Problem: The chocolate base is rock hard
Prevention: Allow the slice to sit at room temperature for 10 minutes before serving. Straight from the fridge, the butter base is very firm.
Color Bleeding
Problem: Pink dye bleeding into white
Recovery: This happens if the mixture is too wet or liquid dye was used excessively. Use gel paste coloring for stability.
Grainy Texture
Problem: The mixture feels gritty like sand
Prevention: Ensure you use icing sugar (powdered), not granulated sugar. Sifting the sugar is crucial to remove lumps.
Flavor Variations
Too Sweet: Add a pinch of salt to the base to cut the sweetness
Too Salty: Not recommended for this sweet confection
Bland: Add raspberry essence to the pink layer or lemon zest to the white layer

Choosing Your Coconut
The type of coconut you use makes a significant difference. You want 'desiccated' coconut, which is fine and dry, rather than 'shredded' or 'flaked' which are larger pieces. The fine texture ensures a smooth, fudge-like mouthfeel.
Ensure your coconut is fresh. Old coconut can taste soapy or rancid, which will ruin the delicate vanilla and sweet milk flavors of the bar.
Essential Ingredient Notes
- Condensed Milk: Use full-fat sweetened condensed milk. 'Filled' or skim versions may not set as firmly.
- Icing Sugar: Pure icing sugar sets harder than icing mixture (which contains cornflour/cornstarch), but either will work for this recipe.
- Cocoa Powder: Dutch-processed cocoa will give a darker color and mellower flavor to the base compared to natural cocoa.

Perfect Layering Technique
Patience is key to distinct layers. While you don't need to chill the white layer fully before adding the pink, you do need to ensure the surface is relatively flat. Use a small offset spatula or the bottom of a measuring cup to compress the layers.
For the cleanest visual appeal, wipe down the sides of the pan after pressing in each layer. This ensures that when you unmold the block, the edges are sharp and the colors are distinct.
Compressing the Mix
The mixture relies on compression to hold together. Don't be afraid to really push down hard when layering. Loose packing leads to a crumbly slice.
Triple-Layer Neapolitan Coconut Ice
📋 Ingredients
For the Chocolate Base
- 395g sweetened condensed milkThe binding agent
- 500g icing sugarSifted to remove lumps
- 400g desiccated coconutFine texture is best
- 1 tsp vanilla extractFlavor enhancer
- Pink food coloringGel or liquid drops
For the Coconut Layers
- 250g plain biscuitsDigestives, Marie, or Graham Crackers
- 150g butter, meltedSalted butter balances the sweet
- 2 tbsp cocoa powderFor chocolate flavor
Instructions
Prepare the Base
Combine crushed biscuits, cocoa powder, and melted butter in a bowl. Mix until it resembles wet sand. Press firmly into a lined 8x8 inch square pan to form the bottom layer. Chill while preparing the next steps.
Make Coconut Mixture
In a large mixing bowl, combine the sweetened condensed milk and sifted icing sugar. Stir in the vanilla extract and desiccated coconut until a stiff, sticky dough forms.
Layer the White
Divide the coconut mixture in half. Take one half and press it firmly over the chilled chocolate base, using the back of a spoon to smooth it out evenly.
Layer the Pink
Add a few drops of pink food coloring to the remaining half of the coconut mixture. Knead or mix until the color is evenly distributed. Press this pink layer over the white layer.
Finish and Chill
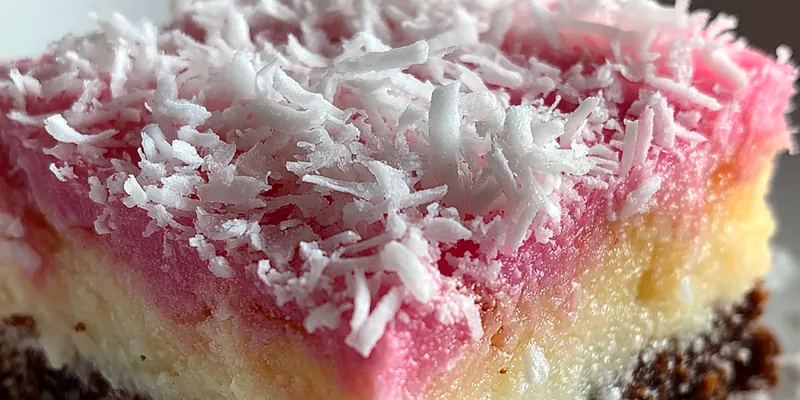
Sprinkle loose desiccated coconut over the top while the pink layer is still tacky. Refrigerate for at least 3 hours or overnight until set firmly. Slice into squares with a warm knife.
Recipe Notes & Tips
Storage
Store in an airtight container in the refrigerator for up to 2 weeks. Can be frozen for up to 3 months.
Serving Suggestions
Serve chilled or at room temperature. Perfect with a cup of black tea or coffee to balance the sweetness.
Variations
Try using green food coloring and peppermint extract for a choc-mint version, or swap the chocolate base for a plain biscuit base.